

Workspace Start
Create a workspace
Connect Git (or start from a WebCentral WAR), work through the Workspace setup steps checklist, and create the workspace.
Last updated
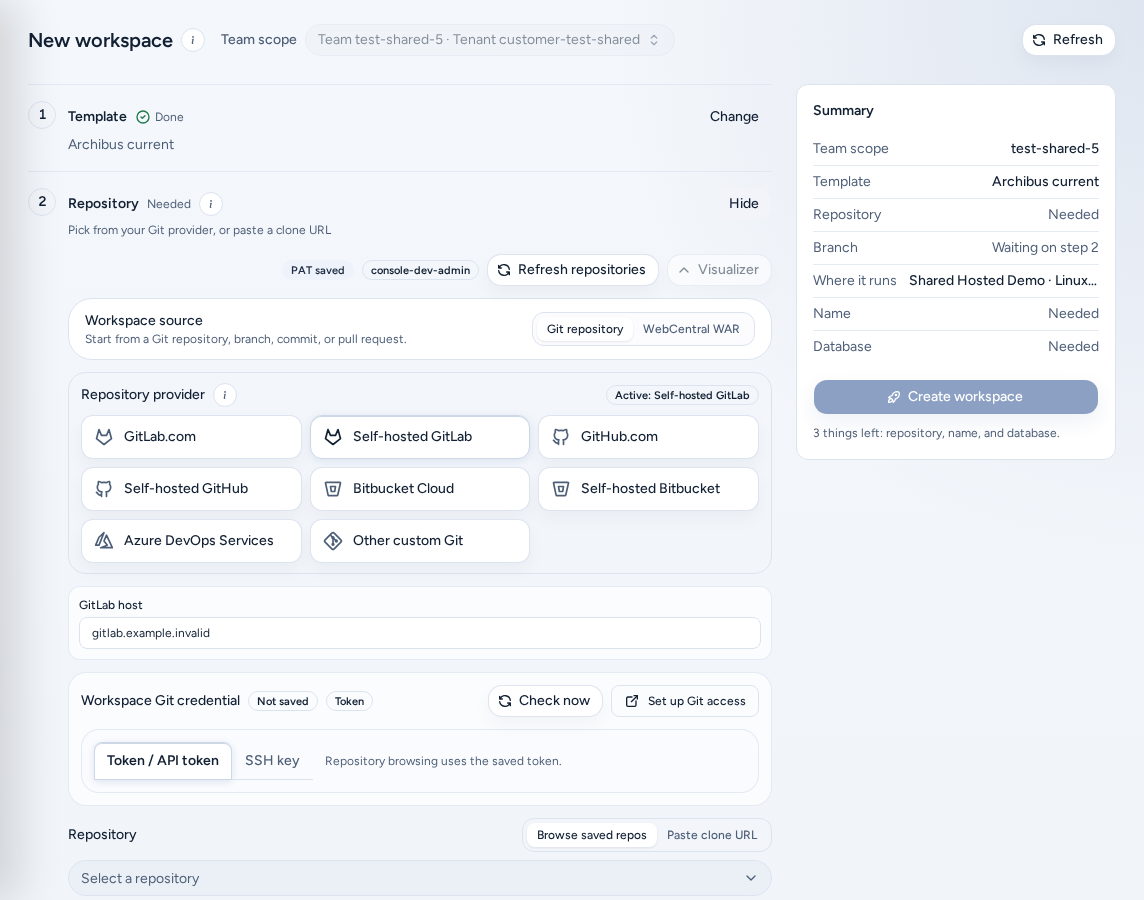
The New workspace page (/create) builds one workspace at a time. Open it with New workspace on My Workspaces. The older /create-workspace, /presets and /?tab=create links open the same page.
Who can use it
- Team members and team admins can create workspaces when their team has a published template and a workspace target.
- Platform operators and platform admins can create workspaces for the teams they are allowed to manage.
- A new login that has not joined a team yet is sent to account setup first. See Customer admin setup.
If a step shows Needs a team admin, only an admin can fix it, for example by publishing a template or adding a target.
Set up Git first
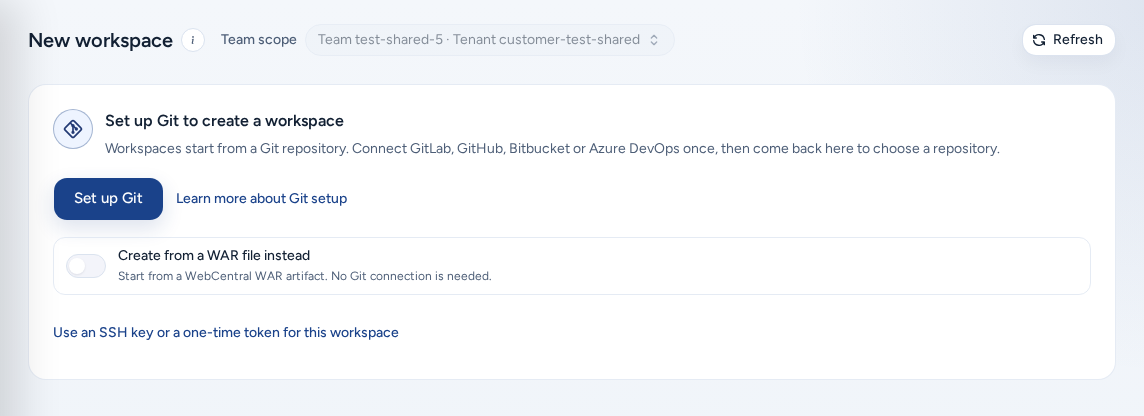
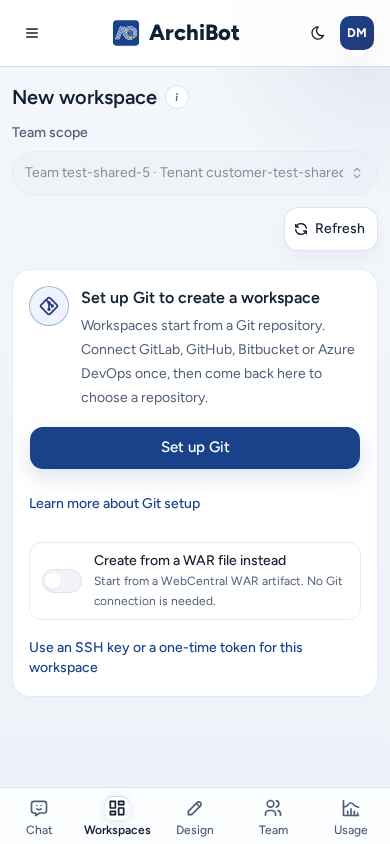
Git-based workspaces clone a repository, so Create checks your Git connections before it shows the checklist. While it checks, the page shows Checking your Git connections…. If none of your connections are usable, Create shows Set up Git to create a workspace in place of the checklist:
Workspaces start from a Git repository. Connect GitLab, GitHub, Bitbucket or Azure DevOps once, then come back here to choose a repository.
- Choose Set up Git. Console opens Settings → ArchiBot account → Git Access (the Git repository access view).
- Connect one provider. GitLab, GitHub, Bitbucket and Azure DevOps are supported, with browser sign-in (OAuth) or a saved token, depending on the provider. See Settings: Git Access.
- Choose Return. Create loads again and checks your connections again.
One usable connection is enough. A connection counts when Settings → Git Access shows it as Ready, Saved (saved but not yet checked) or Needs review. A connection marked Invalid or Setup needed does not count.
If you don’t need Git, turn on Create from a WAR file instead (“Start from a WebCentral WAR artifact. No Git connection is needed.”). The checklist then appears with the WAR source selected. Switching the source back to Git repository brings the gate back.
If you clone with an SSH key or a token that only this workspace uses, choose Use an SSH key or a one-time token for this workspace below the switch. The gate closes and the checklist opens with Git repository selected, so you can enter the key or token in the Repository step (see Git credentials below). The checklist then stays open, even if you change the source, until you leave the page.
DevOps templates make Git optional, so the gate never appears for them: Create shows the normal checklist, and its Git access step is optional. If a DevOps template is available to you, the gate also shows Use a DevOps template instead, where Git is optional; choosing a Git-based template again brings the gate back, unless Create from a WAR file instead is on or you chose Use an SSH key or a one-time token for this workspace.
If Console cannot check your Git connections at all, for example because of a network error, it shows the normal checklist rather than blocking you. The Repository step then reports the Git problem.
Learn more about Git setup opens this section.
How the checklist works
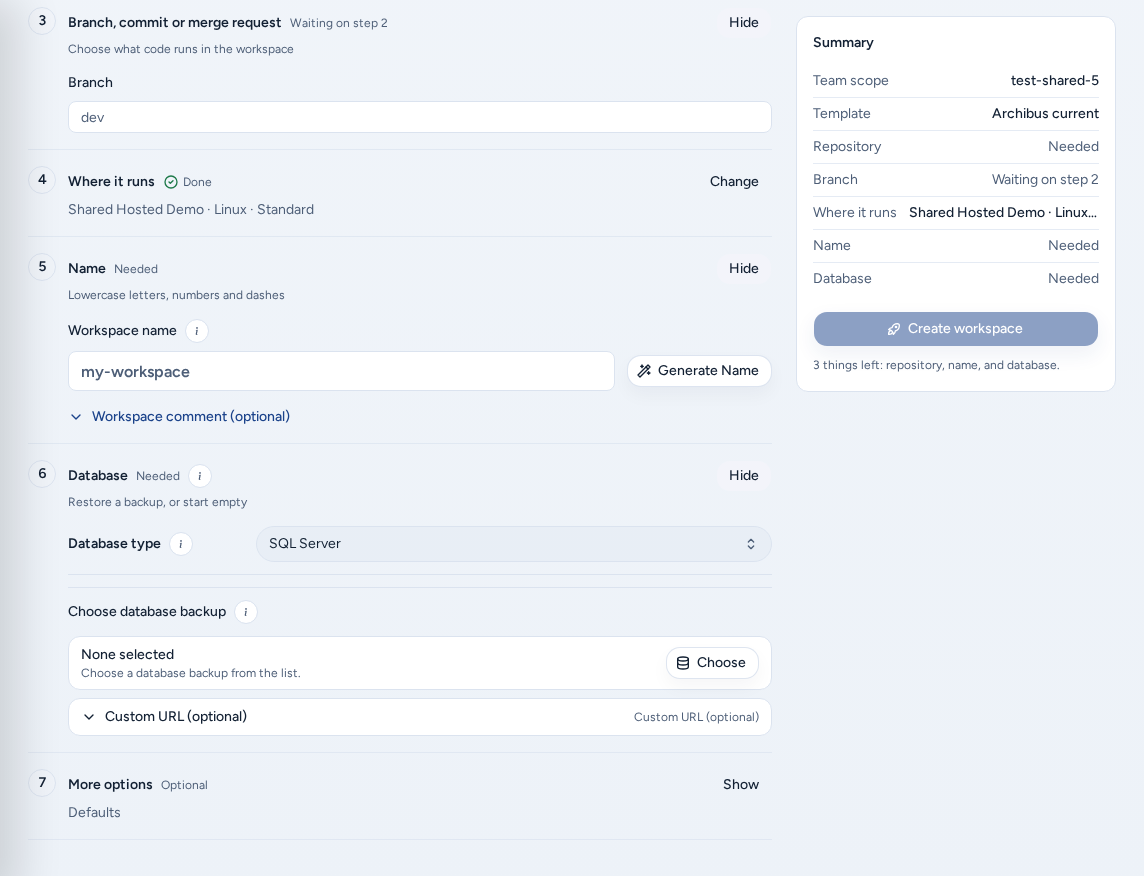
Below the page header, Workspace setup steps lists every choice in order. Each step shows a status: Done, Needed, Optional, Checking…, Waiting on step N or Needs a team admin. Unfinished steps open automatically. Use Change, Show or Hide to open or close a step.
| Step | Title in Console | What you choose |
|---|---|---|
| 1 | Template | The kind of workspace. |
| 2 | Repository (Git) or Workspace source (WAR) | The repository and Git credential, or the WAR artifact. |
| 3 | Branch, commit or merge request | The code the workspace runs. Git only. |
| 4 | Where it runs | Target, operating system and size. |
| 5 | Name | The workspace name. |
| 6 | Database | Restore a backup, or Start empty. |
| 7 | More options | Schedule, toolchain and integrations. |
DevOps templates use a shorter list: Template, Git access (optional Git credentials), Where it runs (with DigitalOcean access), Name and More options.
The Summary card lists the team and each step, and says what is still missing: “Ready to create.”, “1 thing left: …” or “N things left: …”. Choose an item in the summary to jump to its step.
There is no saved-preset library in Create. To repeat a launch, see Workspace presets.
Pick a template family
In Template (“Choose the kind of workspace”), pick a template family. Each family sets the toolchain, database expectations and runtime image. A family can show Unavailable:
- “Available once a target is set in step N.” Choose a target in Where it runs, then come back.
- “Not published on target. Ask a team admin to publish it.”
- “No template is published for this team yet. Ask a team admin to publish one.”
Don’t borrow another team’s template to get around this. Ask your team admin, or see Catalog and readiness.
Choose the repository and branch
For a Git workspace:
- In Repository (“Pick from your Git provider, or paste a clone URL”), choose the Repository provider. The fields below change for each provider.
- Pick the repository with Browse saved repos, or use Paste clone URL.
- In Branch, commit or merge request (“Choose what code runs in the workspace”), choose the branch, a commit or a merge/pull request.
- Optional: add Secondary repositories. They are cloned in order into
/home/codespace/applications/<repo-name>. - Check the Git username and email. Commits made in the workspace use this identity. It defaults to your current sign-in and is separate from your Console display name.
Git credentials
Private repositories need a credential that works for both Console and the workspace.
- Token or browser sign-in. Use the connection from Settings → Git Access, or the workspace credential fields that the provider shows. Console shows whether a credential is saved and healthy, but never shows the saved value again.
- Self-hosted GitLab. Enter the GitLab host, your GitLab username (not the display name) and a personal access token. Recommended scopes:
read_apiorapifor browsing,read_repositoryfor clone and fetch, andwrite_repositoryonly when workspaces should push. Choose Replace PAT to rotate it. - SSH. Paste the SSH private key (required) and optionally the Public key. The workspace needs the private key to clone and push over SSH, and the key is stored with that workspace. SSH mode cannot list repositories or branches, so paste the SSH clone URL yourself.
If you have no saved Git connection, Create shows Set up Git to create a workspace first. Choose Use an SSH key or a one-time token for this workspace there to reach these fields.
Never put a token or private key in a repository URL, the workspace comment or a support request.
Start from a WAR artifact instead
Use a WAR source when the workspace should start from packaged Archibus files instead of a repository clone. No Git connection is needed.
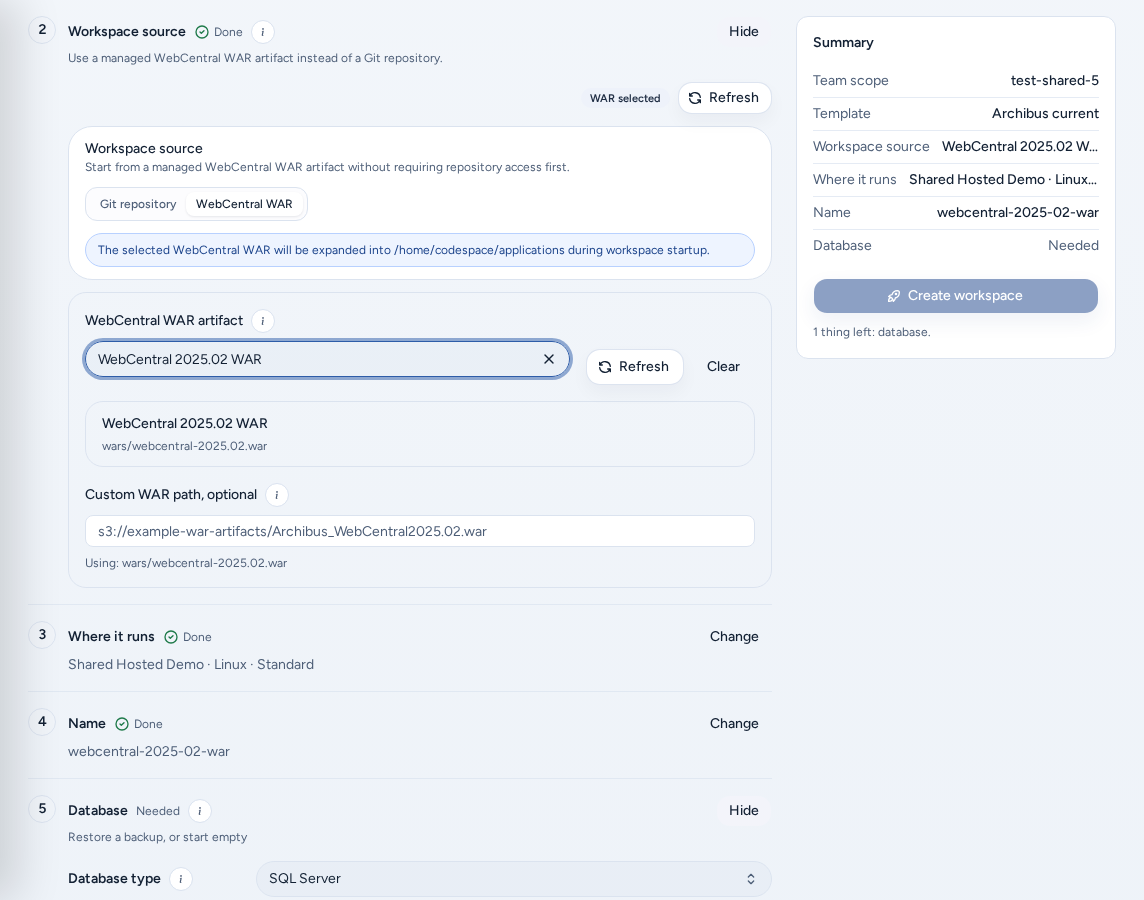
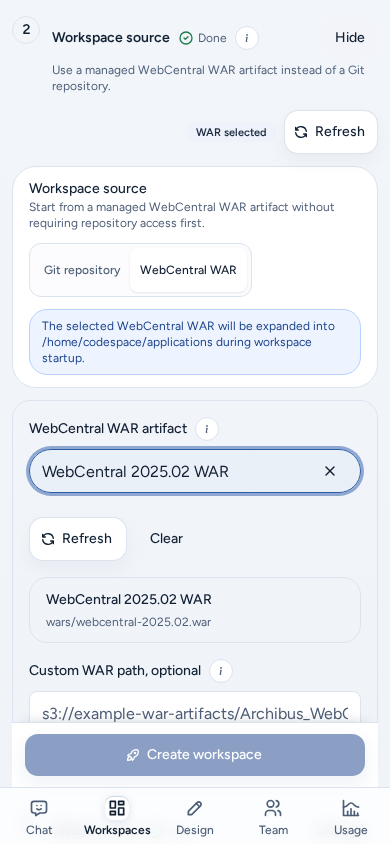
- Select WebCentral WAR under Workspace source, or turn on Create from a WAR file instead on the Git setup screen.
- In the Workspace source step, choose a WAR artifact from the managed catalog.
- Only if the artifact isn’t listed, enter a Custom WAR path. It must be a managed
s3://,file://or HTTPS path that Console can reach. Don’t paste a public download link.
A WAR workspace has no Branch, commit or merge request step and skips the repository clone. The WAR is expanded into /home/codespace/applications when the workspace starts. The template and target still need to support WAR workspaces.
Where it runs
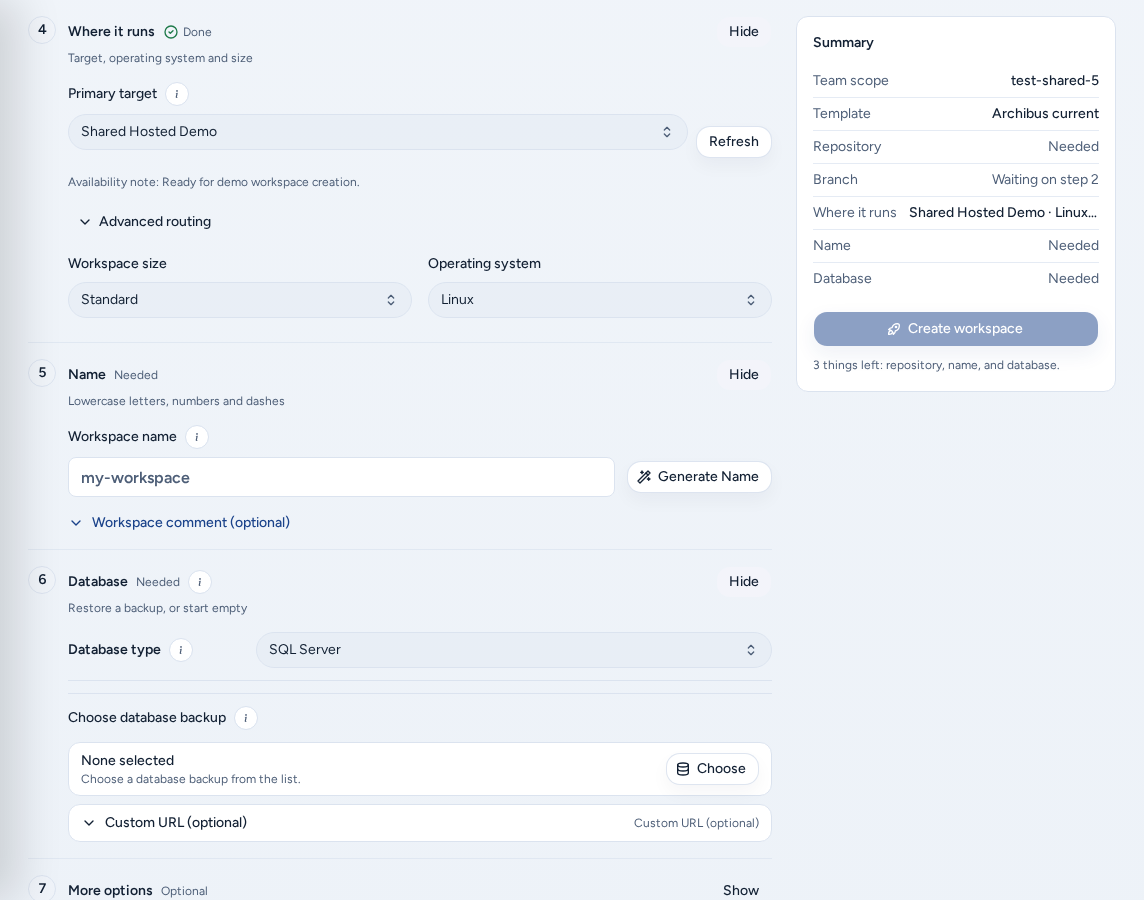
Where it runs (“Target, operating system and size”) chooses where the workspace is provisioned.
- Choose the target, then the Operating system and Workspace size. Console lists only the targets and sizes your team may use. If no target is listed, a team admin needs to add one.
- Open Advanced routing to see Cloud routing: the Primary target, the Fallback policy and any Fallback targets. Some teams are restricted to their bound target set, and others only prefer it.
- If the workspace restores retained storage, Create asks for approval. Until that is done, “retained storage approval” appears in the Summary.
DevOps templates also show DigitalOcean access here. If it says “DigitalOcean sign-in isn’t set up for this Console”, ask a platform admin.
Name
Enter a Workspace name: lowercase letters, numbers and hyphens only, within the length shown. Generate Name suggests one. Console checks availability as you type (“Name is available.” or “Workspace name is not available.”). A final check runs when you create.
The optional Workspace comment is saved in Console with the workspace. Don’t put passwords, API keys or other secrets in it.
Database
- Choose the Database type. Console remembers it per repository URL. None skips the backup requirement.
- Choose a restore source under Choose database backup to restore a backup. Or choose Start empty.
- Only when the backup you need isn’t in the approved list, paste a Custom backup URL.
To upload a backup or link backups to a repository, use Backups.
Integrations
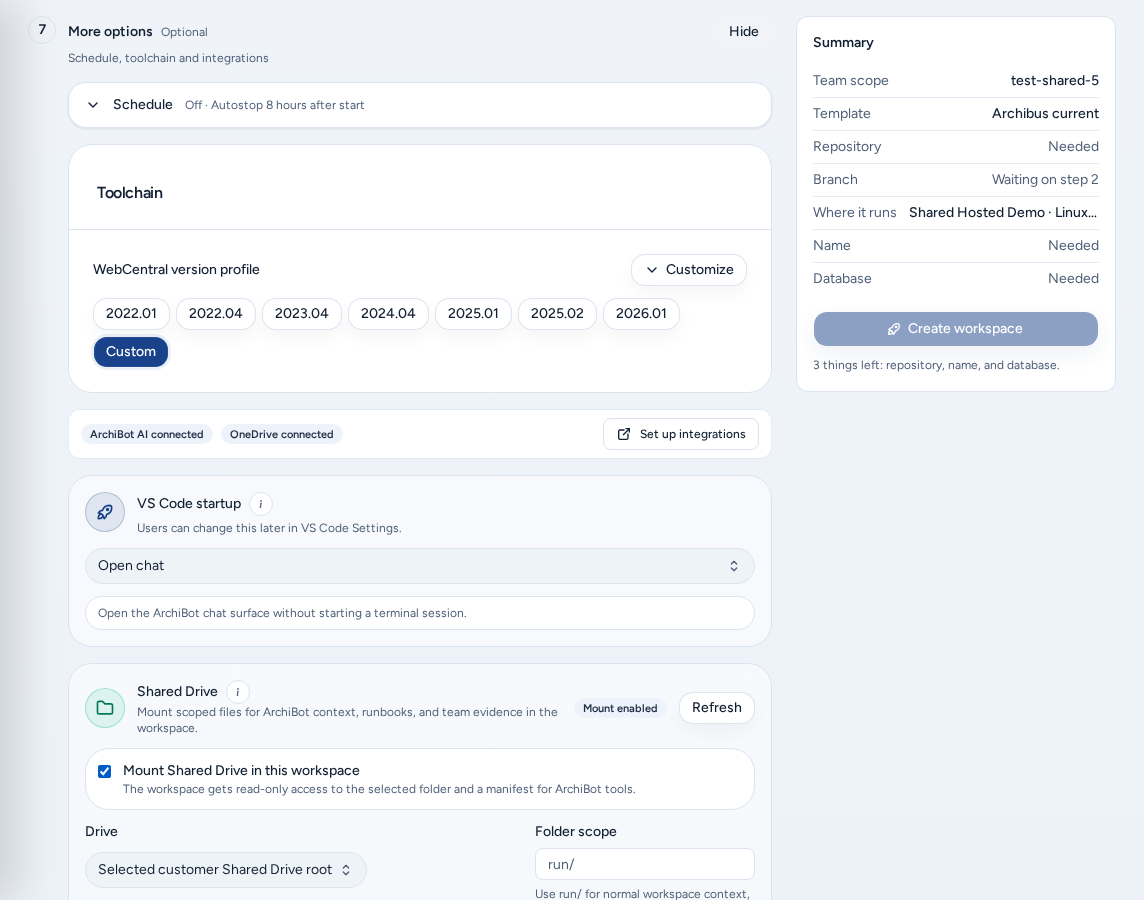
More options (“Schedule, toolchain and integrations”) holds the optional settings:
- Schedule: autostart and autostop for the new workspace.
- Toolchain: the WebCentral version profile, which sets Java, Gradle and Tomcat together.
- Jira: your Atlassian email, the Jira site URL, an Atlassian API token and a Default project key for new issues. With a saved token, pick a Ticket assigned to you. The Suggested branch name is passed to the workspace, which offers it as the ticket branch to create after startup.
- Linear.app: a personal Linear API key.
- OneDrive: connect your Microsoft account to sync ArchiBot session summaries and shared files.
- Shared Drive: mount a team or personal drive read-only, or attach scoped context. Pick a Folder scope such as
run/. See Shared Drive. - VS Code startup: what the ArchiBot VS Code extension opens when a browser or desktop VS Code connects. You can change it later in VS Code settings.
Reusable credentials (Jira, Linear, OneDrive, Shared Drive) can also be set once in Settings → Integrations. Only connect services your team has approved.
Managed AI access
The Managed AI access notice explains how ArchiBot works inside the new workspace. Console-managed credentials power the archibot command and ArchiBot skills in workspaces that support them. Personal agent commands stay yours: you can sign in to your own account in the workspace without Console overwriting it.
The ArchiBot panel shows whether managed login is connected. Use Connect to start a device login, or choose Bring your own Codex API key if your team allows it. A saved key is reused for your future workspaces. Usage draws on your team’s ArchiBot Credits. See Usage and analytics.
Create the workspace
- Work down the checklist until every step is Done or Optional.
- Read the Summary. It should say “Ready to create.”
- Choose Create workspace once.
- Watch the build log. Build output streams while the workspace is provisioned, then Build finished appears and the log switches to workspace startup.
- Open the workspace from My Workspaces when it is running.
If Create shows a validation error, fix that field before trying again.
On a phone
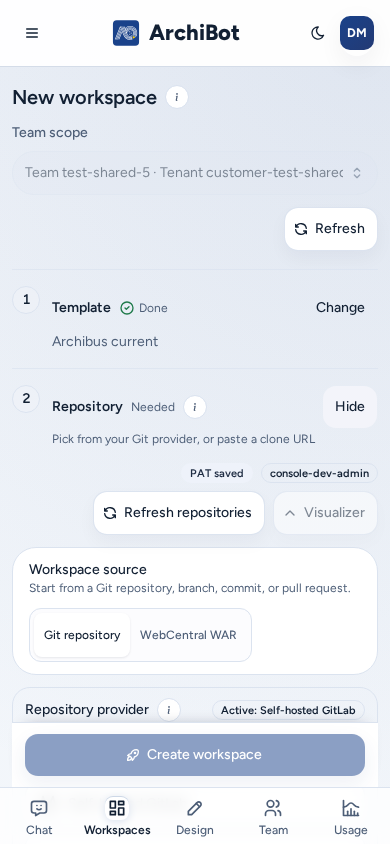
- The Git setup screen fits the phone. Set up Git is a full-width button near the top, Create from a WAR file instead is a full-width switch, and Use an SSH key or a one-time token for this workspace is a link below the switch.
- Set up Git opens the Git Access view in Settings. Return brings you back to Create.
- The checklist is a single column, and the Summary appears below it.
- Create workspace stays pinned to the bottom of the screen as you scroll, including for a WAR source. The Summary’s own button is hidden, so there is only one Create button.
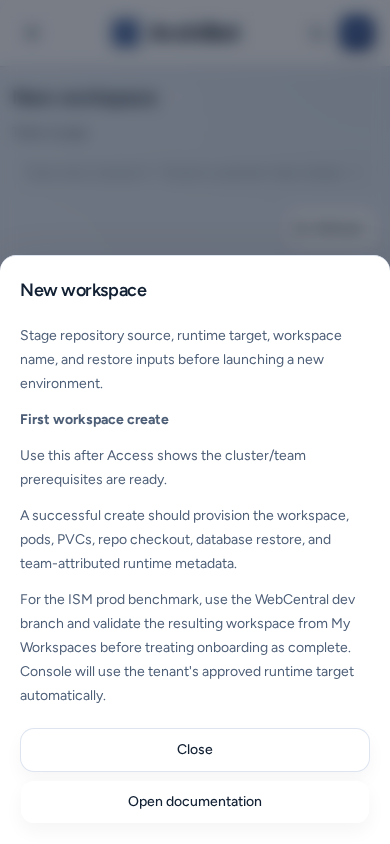
- Help (i) buttons open their explanation as a sheet from the bottom of the screen. Open documentation links to this guide.
Troubleshooting
| What you see | What it usually means | What to do |
|---|---|---|
| Set up Git to create a workspace | No usable Git connection. | Choose Set up Git, turn on Create from a WAR file instead, or choose Use an SSH key or a one-time token for this workspace. |
| Template Unavailable | There is no target yet, or no template is published for the target. | Set Where it runs first, then ask a team admin. |
| ”No target is available for this team.” | No target is attached to the team. | Ask a team admin or platform operator. |
| No repositories listed | Wrong provider or host, or the token lacks browse scope. SSH mode cannot list repositories. | Check the provider in Settings → Git Access, or paste the clone URL. |
| ”Workspace name is not available.” | The name is taken. | Choose another name or use Generate Name. |
| ”Pick a backup or paste a custom backup URL before creating the workspace.” | The template needs a database restore. | Choose a backup, or set Database type to None if the template allows it. |
| Create workspace stays disabled | A step is unfinished. | Read the Summary’s “N things left” list. |
Related guides
- Settings: Git Access and reusable integrations.
- Workspace presets: repeat a known-good launch shape.
- Backups: upload and choose restore sources.
- Manage workspaces: start, stop, open and update workspaces.
Done When
- At least one Git connection is ready in Settings, or you chose Use an SSH key or a one-time token for this workspace, or Create from a WAR file instead.
- Every step in Workspace setup steps shows Done or Optional.
- The Summary reads "Ready to create." before you choose Create workspace.