


Customer Admin
Customer admin setup
Use Account Setup to confirm your team, invite members, submit SSO details, connect Git, check billing and the workspace target, and launch the first workspace.
Last updated
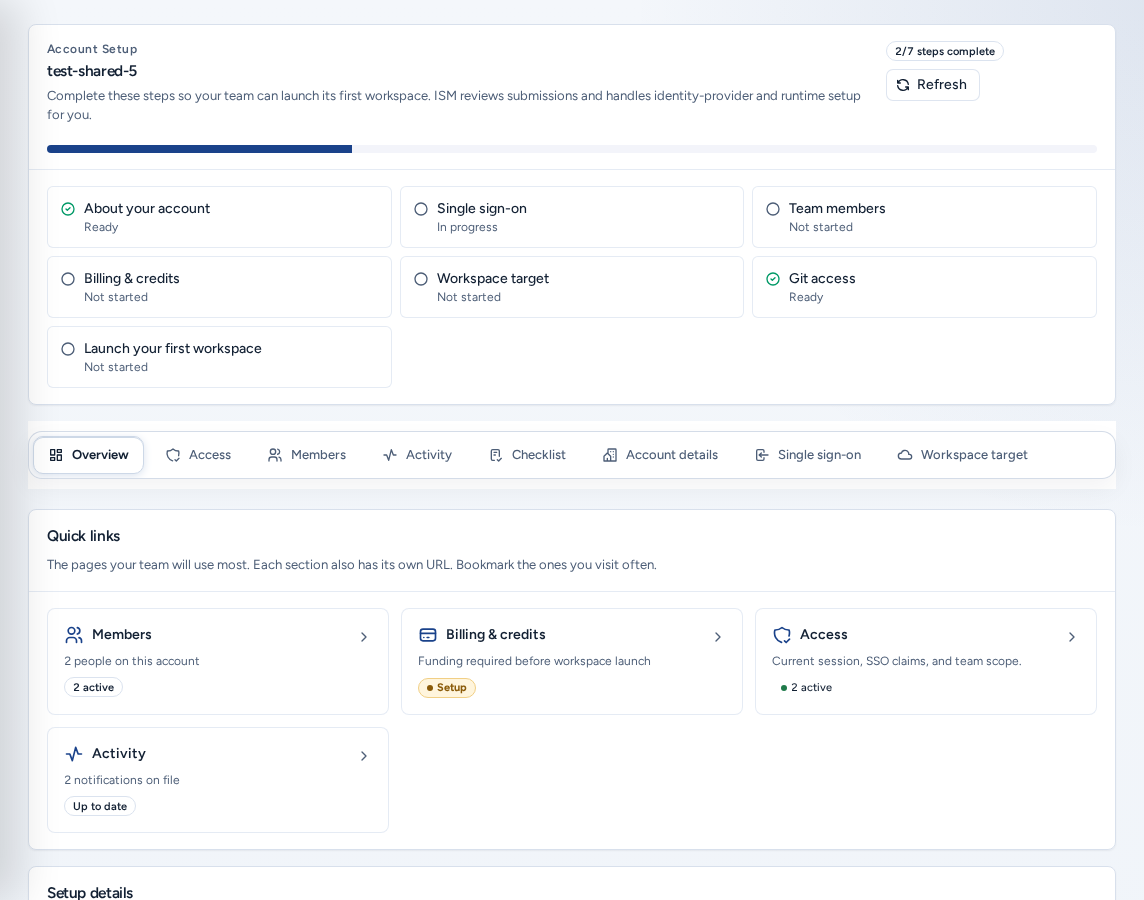
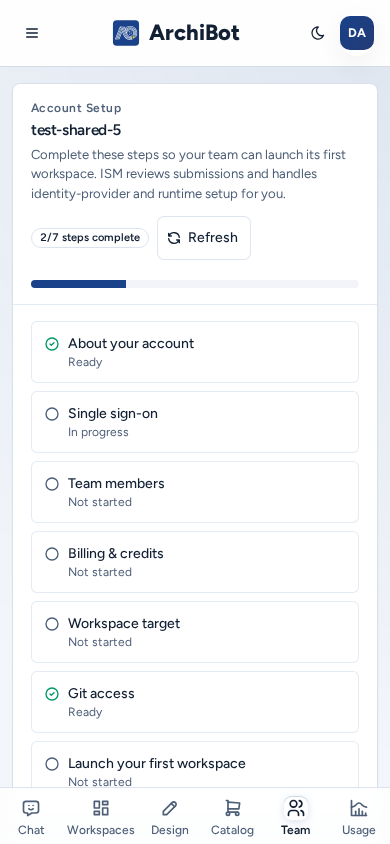
Account Setup (/account) is where a team admin gets a team ready for its first workspace. You confirm who you are, invite your team and give ISM the non-secret details it needs for sign-in and hosting. Each step turns ready as you go. ISM reviews what you submit and handles the secret-backed and operator-only work.
Who can see it
- Team admins open it from Members & access in the navigation (Team in the phone bottom bar).
- A new login that isn’t on a team yet is sent here to finish setup, and until then only sees Chat and Account Setup. If your email domain already belongs to an organization, Console offers Request team access instead. See Access roles.
- Team members don’t see Account Setup. Members & access takes them to Account access.
- Platform operators are sent to the Access admin page, where they manage the same setup for any team. See Tenant admin for operators.
First ten minutes
- Open Account Setup. The Overview shows the steps grid and “N/M steps complete”.
- In Account details, confirm the team name, contacts and intent, then choose Save account details.
- In Members, invite at least one teammate so you have a backup admin.
- If your team uses an identity provider, submit it in Single sign-on. Otherwise keep using email invitations.
- In Billing, confirm billing is verified or trial-approved.
- In the Overview’s Git access step, choose Open Git access settings and connect a repository provider.
- In Workspace target, confirm the target shows Ready and not Waiting on ISM.
The Account Setup layout
The Overview steps grid shows each step with its status: About your account, Single sign-on, Team members, Billing & credits, Workspace target, Git access and Launch your first workspace. Select a tile to open its section.
Each section has its own address:
| Section | Address | What it covers |
|---|---|---|
| Overview | /account | Steps grid, member and billing summary, Git access and first workspace. |
| Access | /account/access | How Console sees your session and memberships. See Access roles. |
| Members | /account/members | Invitations, join requests, roles and new-member access defaults. |
| Billing | /account/billing | Billing state, payment rail, plan, and Invoices & attribution. |
| Activity | /account/activity | Account events and notifications. See Account activity. |
| Checklist | /account/checklist | Every onboarding task ISM tracks, with per-task controls. |
| Account details | /account/details | Contacts, intent and timing. |
| Single sign-on | /account/sso | Non-secret OIDC or SAML details. |
| Workspace target | /account/target | Readiness of the target ISM manages for you. |
When billing is verified or trial-approved on a small-team plan, a You’re cleared to self-serve banner appears. You don’t need to wait for ISM: invite your team and Launch a workspace. SSO and a dedicated target are optional.
If you see Waiting for your account scope, your sign-in worked but Console doesn’t see a team for you yet. Choose Check again after a minute, and contact onboarding if it persists.
Account details
- Set the Primary contact, the Billing contact email and the Technical contact email.
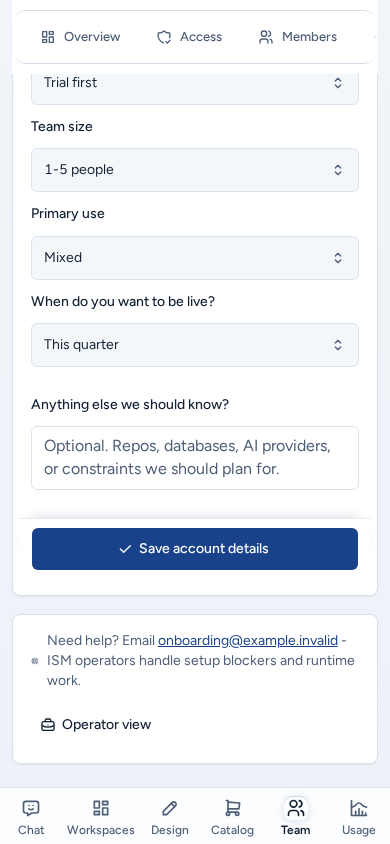
- Choose a Payment preference, Team size and Primary use.
- Answer When do you want to be live?.
- Use Anything else we should know? for repos, databases, AI providers or constraints.
- Choose Save account details.
Everything here is visible to your team. Don’t enter credentials, card numbers or invitation links.
Invite and manage members
In Members, enter an Email, choose a Role (Team admin or Team member) and choose Send invite. Each row in Current members shows the role and status (Active, Invited or Disabled), with Promote to admin / Demote, Disable / Re-enable and Remove.
Requests to join your team lists people who signed in with a domain your account has claimed. Approve the ones you expect. New-member access defaults controls whether new members can use Chat, API and Workspaces. Full steps are in Access roles.
Submit and verify SSO
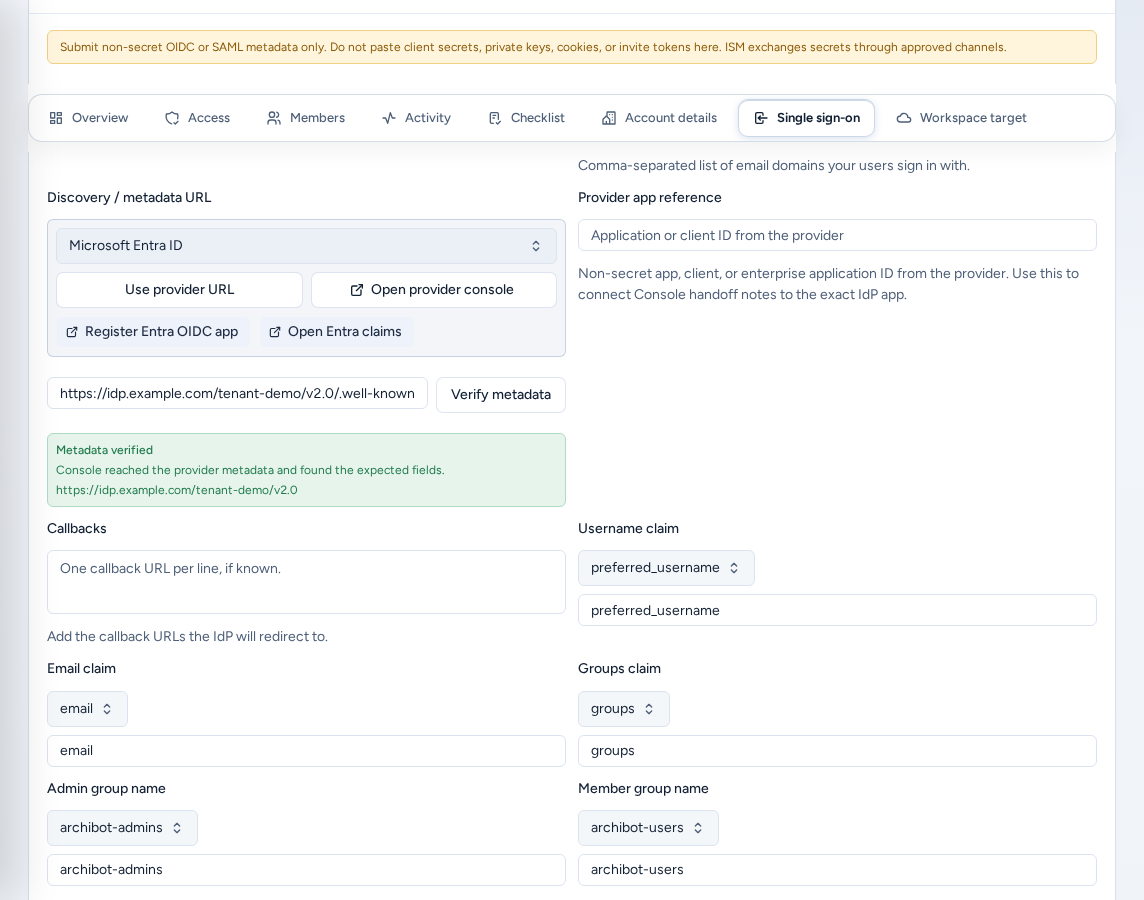
Open Single sign-on (/account/sso) when your team is ready to connect an identity provider. Small teams can keep using email invitations. You submit non-secret details, and ISM configures the connection. Submitting doesn’t turn SSO on. ISM contacts you when it’s ready to test.
- Protocol and domains. Choose the IdP type (OIDC, SAML, or No SSO yet (use invite emails)) and enter the Login domains your users sign in with. Provider metadata lookup can fill in common metadata addresses. Open provider console opens the provider’s admin page.
- Metadata. Enter the Discovery / metadata URL (an OIDC
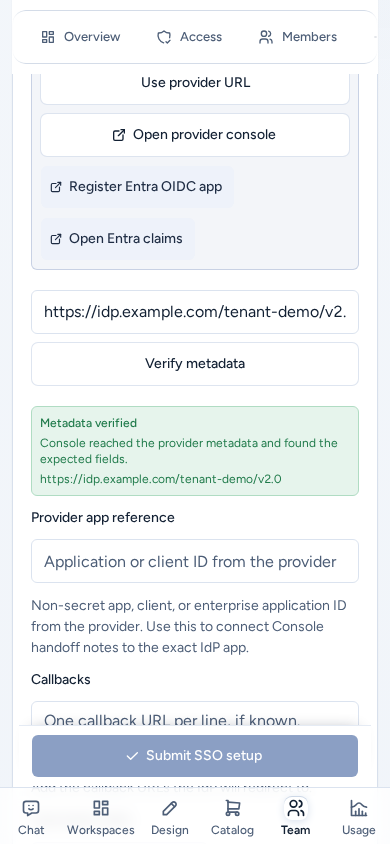
.well-known/openid-configurationaddress or a SAML metadata URL) and, optionally, the Provider app reference (the application or client ID). Choose Verify metadata. “Metadata verified” means Console reached the provider and found the expected fields. - Claims and groups. Set the Username claim, Email claim and Groups claim, and the Admin group name and Member group name that map to team admins and members.
- Callbacks and validation. Add the callback URLs the provider will redirect to, and a Test admin email and Test member email for the end-to-end test.
- Optional: request SCIM provisioning if your provider will push user changes. Give only a SCIM token reference, never the token itself.
- Add SSO notes (approval windows, IP allowlists, claim quirks), then choose Submit SSO setup.
Never paste client secrets, private keys, signing material, passwords, cookies or invitation links. ISM exchanges secrets through an approved channel.
The (i) buttons next to each field explain it and link to this section. Platform operators record the same details for a team from Access as an SSO setup request.
Connect Git access
The Overview’s Git access step shows Git access ready or that Git is still needed. Open Git access settings opens Settings → Git Access. Connect at least one provider before anyone creates Git-backed workspaces or runs CI review. WAR-based workspaces don’t need Git. See Create a workspace.
Check billing readiness
Billing (/account/billing) shows Billing state, Payment rail and Service plan. Workspaces start once billing is verified or trial-approved and your universal ArchiBot Credit balance can cover new usage. Open Catalog & top up opens the Product Catalog. The Invoices & attribution tab shows Stripe invoice history next to the recorded usage. See Billing.
Review the workspace target
Workspace target (/account/target) shows the target ISM has attached for your tenant: cloud and region, Template aliases and Supported Git providers. You review it, but you don’t edit credentials or templates. Waiting on ISM means your part is done. If there’s no target yet, ISM emails you when it’s attached.
Work the checklist
Checklist (/account/checklist) lists every onboarding task. Use Start, Mark blocked, Mark done and Reopen to keep ISM’s view accurate. Some tasks are ISM’s to finish. If one of those is holding you up, mark it blocked.
On a phone
- Account Setup works on a phone in a single column. The section tabs and steps have full-size tap targets. The section tabs scroll sideways and stay at the top of the screen as you scroll.
- Save account details and Submit SSO setup stay pinned to the bottom of the screen while their form is open, so you don’t have to scroll to find them.
- Select lists, such as the payment preference and IdP type, fit the screen.
Troubleshooting
- Account Setup is missing: you are a team member or a platform operator. See Who can see it.
- A step stays blocked: read the blocker text. Billing, SSO, target and template problems won’t clear by retrying Create. Mark the checklist task blocked so ISM sees it.
- “Metadata needs attention”: check the metadata URL and protocol with your identity-provider admin, then choose Verify metadata again.
- SSO submitted, but sign-in hasn’t changed: ISM still has to configure and test it.
When you contact support, include the team name, the blocked item, the visible message and your last action. See Support handoff.
Related guides
Done When
- Account details are saved and at least one other admin is invited.
- Git access is connected, or you plan to start from a WAR artifact.
- Billing is verified or trial-approved and ArchiBot Credits can cover new usage.
- Workspace target shows Ready, or the remaining blocker is clear.